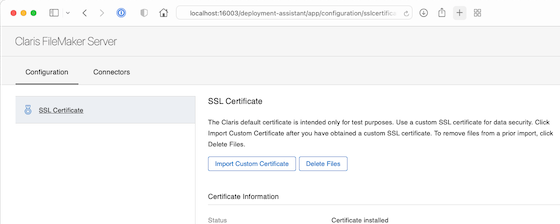
FileMaker Server Console on 16001 or 16003 on headless server

If you need to connect to a server, and there is no GUI desktop access, you can normally connection via https without problems. However, if for some reason that access is not working, you might want to connect via port 16001 (primary) or 16003 (secondary/web worker). But that access is only allowed on the loopback (localhost) interface, so is not normally accessible externally. And since you have no local desktop on the server, you are locked out.

On macOS and Linux systems however there is an alternative if SSH access is available between your desktop and the server. We can create an SSH tunnel between the two systems which will make your remote connection appear as if it was connecting locally to the FileMaker server.

Use the following command to set up a connection to a secondary server:

ssh -L 16003:localhost:16003 -N -f myuser@myworker.domain.com

For the myuser@mworker.domain.com portion above, replace it with the normal connection string you use to connect to the FileMaker Server. If connecting to a primary server, you’ll need to replace the two places where it says 16003 with 16001 instead.

After the password prompt (if any) you will then be returned to the shell prompt.

To connect to your remote system, pop open your browser with this URL for a secondary server:

http://localhost:16003

You should then see the following page in your browser.

Gooey Gadgets 0.37

This is small background app I wrote a while ago, and just rev’d it once again.

Recapping things, it is a small background application for adding UI functionality that is not easily available in either AppleScript or Filemaker. It supports the following UI elements:

Message Window: display a single line of text sized to fit across entire width of screen (like Address Book)
Progress Window: smaller window displaying a progress control and a cancel button
Table Window: displays list data in a row & column format
Text Window: for larger amounts of text that won’t fit in a typical dialog

Includes both an AppleScript and a .fp7 demo file.

Download at http://sibr.com/downloads/Gooey Gadgets.zip

Use Bonjour name to connect to a system

Many servers and devices, especially those that are Mac OS based, use Bonjour to broadcast their location. On a few occasions, I’ve known that a particular server or workstation was on the network, but not its address.

This tip has two parts to it. The first part of this, and more commonly known, is how you can use a system’s computer (Bonjour) name to contact a system. You can see this for a file server if you go to the Finder’s Network browse folder.

In the example above, there is only one system broadcasting its availability, and showing its name as iMacIntel. From here, I could connect to the system if it was a file server or share its screen if screen sharing (AKA VNC) was enabled. But what if I want to connect via SSH or ping it. Since I know its Bonjour name, I can ping the system in the Terminal by adding .local as a suffix like so:

ping imacintel.local

Now that we know how to use a system’s name as a hostname, how do we find a system if it isn’t showing up in the network view? That will be in the next post.

Gooey Gadgets 0.36

This version adds the display table window AppleScript command to display lists of data in a column & row format. Here’s an example of what it looks like and how to use from AppleScript:

display table window “Table Title” label “my rows and columns” data {{“1”, “one”, “uno”}, {“2”, “two”, “dos”}, {“3”, “three”, “tres”}}

Download at http://sibr.com/downloads/Gooey Gadgets.zip.

Gooey Gadgets 0.3.0

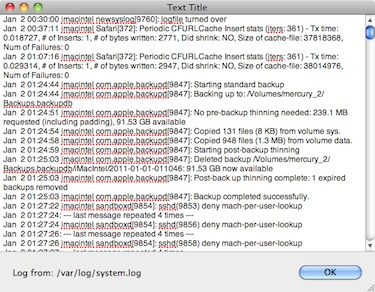
Since my last post I’m now up to version 0.3.0, which includes a new command, display text window. This command can be used to display larger amounts of text in a dialog. Currently, the text inside this window is editable. However, there is probably no easy way to properly support the editing of text, so it’s likely this will change to a static view soon. Here’s an example of what it looks like and how to use from AppleScript:

display text window “Text Title” label “Log from: /var/log/system.log” message (do shell script “cat /var/log/system.log”)

There have also been some minor changes to the parameters used for the update window and display progress window commands so that they are consistent with display text window. These may require you to edit or recompile any scripts to use the new version.

Download at http://sibr.com/downloads/Gooey Gadgets.zip.

Gooey Gadgets 0.2.1

I’ve updated the app with some improvements to the original show message window command, added a new display progress window command, and included a couple of example files showing how to use the app.

There’s one glaring omission in the current version: how to detect when the user has canceled the progress dialog. For that, I’ll probably add a list windows function, or something similar.

I did some investigation into creating a windows Applescript class of its own. This would be especially helpful with implementing the features for the progress window so you could say something set title of window 1 to “Hi”. However, adding support for a class requires a significant amount of work, and I’d rather spend the time right now on adding more interface elements. So any improvements on the object oriented front will have to wait.

Once again, the download link is at:

http://sibr.com/downloads/Gooey Gadgets.zip

Display Large Type window à la Address Book

There’s a few times I would’ve like to prominently display a phone number or some other piece of information from a script or FileMaker. Apple’s Address Book application makes good use of this. If you right-click on a phone number you get this:

There’s a nice utility by the name of BigHonkingText that comes pretty close to this, but you must execute it via the command line, and has a few small differences from Address Book in its implementation

Since I was hoping for an all AppleScript solution and was trying to get as close a match as possible, I’ve cooked up an app of my own for this.

Called Gooey Gadgets, it is a faceless “helper” applcation that has the following commands:

dismiss window v : close given window
 dismiss window integer : the window number to close
  → boolean : returns true if the window was found

display message window v : Create a translucent window with one line message
 display message window text : a brief message to display
  [giving up after integer]: number of seconds to wait before dismissing window
  [screen point]: X,Y coordinates for any point within screen to be used to display the window
  [transparency integer]: the window’s background transparency (alpha) as a percentage
  → integer : the window id
  • The screen coordinates are an optional value that you can use to make sure the message displays on the same screen as your other script or Filemaker windows. However they are in the coordinate system that Cocoa uses, which has the inverse Y-axis from what Filemaker uses for Get (WindowTop).
  • The giving up after parameter works the same way as Applescript’s Display Dialog command, allowing you to set a maximum time for the window to display (the user may click on the window to dismiss it before then).
  • The transparency parameter is not yet implemented, so its value is ignored.
An example of its usage looks like this:
tell application id “com.sibr.gooeygadgets” — could’ve also used app name instead
 setto display message window “big message”
 delay 4
 dismiss window x — Gooey Gadgets will now quit if this is the last open window
end tell

I have also included command line support, and the options look like this:
Gooey Gadgets.app/Contents/MacOS/Gooey Gadgets -cmd messagewindow [-giveup seconds] [-screenx num] [-screeny num] message

The path used is an artifact of the fact that the command line must execute the actual application binary, not the application’s package folder. So if the application is at /_Projects, a command line example would be:

/_Projects/Gooey\ Gadgets/build/Release/Gooey\ Gadgets.app/Contents/MacOS/Gooey\ Gadgets -cmd messagewindow -giveup 2 "(510) 835-4483"

Download the most recent version at:

Gooey Gadgets.app.zip

After downloading, move it out of your Downloads folder. The first time you run it, you may need to OK the application as safe to run.

PS: Excuse the formatting messiness above. The blog software wasn’t kind to my cut-and-pasting.
New version of bBox FileMaker plugin

One of my work/personal projects has been a FileMaker external plug-in for the Mac OS called bBox. The main push with this recently has was to include access to the Python scripting language. Previously, using bBox’s existing bBox_Shell function I could’ve called a Python script this way:

Set Variable [ $script; Value:”xs = ‘He’ + ‘llo’; print xs # Complicated way to say hello” ]

Set Variable [ $res; Value:bBox_Shell( 0; “python -c \”” & $script & “\””) ]

Show Custom Dialog [ Title: “Python”; Message: $res; Buttons: “OK” ]

That’s definitely do-able. But you’ll likely have to reformat your scripts, and be careful about quoting or escaping characters. Alternatively, you could first ensure that your script had first been saved out to a file, perhaps by using FileMaker’s Export Records command.

But instead, I can now write something like the following from a FileMaker script:

Set Variable [ $script; Value:”# Complicated way to say hello. xs = ‘He’ + ‘llo’

print xs “]

Set Variable [ $res; Value:bBox_PythonCompile( 0; $script ) ]

If [ $res = “” ]

Set Variable [ $res; Value:bBox_PythonExecute( 0 ) ]

Set Variable [ $ig; Value:bBox_PythonFinalize ]

End If

You may be wondering why it takes three function calls to execute such a simple script. There are three reasons for this. Most obviously, a script can be executed multiple times but only needs to be executed once. A related, but less obvious reason is the need to setup and then teardown the Python environment, which is significant for a short script like this. Finally, it allows the option of setting or retrieving Python variables from FileMaker, which can now be done with the bBox_PythonSetVar and bBox_PythonGetVar functions.

Now on Twitter as @sibrcode

OK, well who isn’t at this point? But I’ve actually been pleasantly what some people have been doing with it.

Personally, I won’t be tweeting extensively, just occasionally.